Saturday, August 9, 2014

Solar Decathalon 2002: Trojan Goat

Trojan Goat - by Pakesh Patel
From 2000 to 2002, architecture and engineering students at the University of Virgina worked on the first Solar Decathlon held on the National Mall in Washington D.C. sponsored by the U.S. Department of Energy. Fourteen team designed and built homes powered entirely by the sun. The house won 1st place for architecture (by judges that included Glenn Murcutt) and 2nd place overall. The team also tied for 1st Place in the Energy Balance category, and received several other awards.

The solar-powered house uses renewable energy systems, and integrates building materials that maximize energy efficiency, while minimizing environmental impact. A moveable facade can be adjusted to change the home's insulating values depending on the weather. The solar roof array powers the home and stores excess electricity in a battery array for use at night. Once the batteries are fully charged, excess power supplies the grid.  The 750 square-foot home includes a living room, dining area, kitchenette, home office space, bathroom, bedroom and sunspace. The award-winning solar home was donated to the Piedmont Housing Alliance (PHA), a Charlottesville non-profit housing organization. The PHA sold the home to raise funds for their low-income housing programs.

Trojan Goat: Living Space - by Pakesh Patel

Assistant Professor John Quale of the School of Architecture and Professor Paxton Marshall of the School of Engineering and Applied Science advised the UVA Solar Decathlon team over the course of the two-year project. Former engineering research scientist Dan Pearce also advised the group. After the Solar Decathalon, John Quale initiated and serves as Director of the ecoMOD / ecoREMOD project, an interdisciplinary effort to design, build and evaluate prefabricated and renovated housing units for affordable housing organizations.

Trojan Goat: Bedroom - by Pakesh Patel

Sources


John Quale - Director of the Graduate Architecture Program at UVA - Click through for info on the Trojan Goat
ecoMOD Trojan Horse Project Site
UVA Donates the "Trojan Goat" Solar House to the PHA

Thursday, August 7, 2014

BIQ House

BIQ House Rendering - src
Hamburg, Germany - The 15 unit Bio intelligent Quotient (BIQ) House, part of the 2013 International Building Exhibition, was built to test the world's first "bio-adaptive" facade, which uses micro-algae to shade the building as well as generate energy, designed by Arup, SSC Strategic Science Consultants and Splitterwerk Architects. As the world's first building powered by algae, the facade's bioreactors use photosynthesis to grow the algae, which is then harvested and converted to biomass for energy generation. This process for generating sustainable, renewable energy creates a shimmering, dynamic green facade for the building. The micro-algae, about the size of bacteria, are generated in reactor panels that are supplied with nutrients and carbon dioxide in order to grow. These panels are the secondary skin of the building envelope covering 2,150 square feet of the southeast and southwest facades.

Algae Bioreactor Modules getting Carbon Dioxide - src

The BIQ house has a holistic approach to its energy concept. It captures all the energy needed to generate its electricity and heat from the sun, leaving fossil fuels untouched. The facade includes 129 bioreactors, which help to insulate the building and keep out noise. The height of the algae can be changed to help with daylighting or provide shading from direct sun. Each reactor is controlled by an energy management center which harvests the algae and solar thermal heat as well as turns the reactors towards the sun. Excess heat from the sun, unused by the algae, is either used directly for solar hot water or stored in tanks under the building for later use. When the algae hits a certain rate of growth, some of the algae is harvested and taken into the building for processing, where the biomass is converted into biogas which can be burned to provide heat in the winter and electricity. The carbon dioxide from burning the biogas is then used to feed the algae.

Jan Wurm, Arup’s Europe Research Leader, said: ‘Using bio-chemical processes in the facade of a building to create shade and energy is a really innovative concept.
‘It might well become a sustainable solution for energy production in urban areas, so it is great to see it being tested in a real-life scenario.’

The news comes after Arup announced their vision for the future of skyscrapers which suggested that buildings would be ‘living’ buildings powered by algae that respond automatically to the weather and the changing needs of inhabitants.

Bioreactors - src

Videos


Sources

IBA Hamburg
Micro-Algae Tested for Green Building Facade

Tuesday, August 5, 2014

P.F.1 (Public Farm 1) by WORK Architecture Company

Designers: Amale Andraos, Dan Wood
P.F.1 - © Elizabeth Felicella
Public Farm One, by WORK Architecture Company, was the winner of the Young Architects Program, run by the New York Museum of Modern Art and the PS1 Contempoary Art Center, to design a temporary installation in the courtyards of PS1 in Queens, NY in 2008. This temporary installation was a shift from the previous 40 years concept of the Urban Beach into a new leisure revolution, one that created a new symbol of liberation, knowledge, power and fun for the city. The Urban Farm became the symbol for their "generations' preoccupations and hopes for a better and different future." Since cities have become accepted as having superior benefits to the suburbs, including quality of life and environmental impacts, they now have become the place of experimentation. Public Farm 1 (P.F.1) "is an architectural and urban manifesto to engage play and reinvent our cities, and our world, once again." 


by WORKac

Structure

With the desire to embrace the city's grid as an organizing patter, WORKac created a daisy pattern of six tubes arranged in a hexagon around a seventh tube. This central tube alternates between a structural column or a "picking hole" to access and harvest the crops above. Since this was a temporary installation, they decided to work with cardboard tubes which would be recyclable and biodegradable as the primary building material. Wood blocking and bolts were added to each tube for additional strength and for attaching them together.

by WORKac

Plantings

WORKac selected 51 varieties of herbs, fruit and vegetables to thrive in the urban environment and planted to bloom in succession throughout the summer. The plants are also organized by the “daisy pattern,” each daisy planted with a single species.

Plant Diagram - by WORKac

Irrigation and Power

Rainwater was collected into a cistern from the roof of PS1 which collected over 6,000 gallons of rainwater over the course of the exhibit. The plants were irrigated by a extemely efficient drip irrigation system. P.F.1 was designed to be completely off-grid. An array of eighteen photovoltaic modules was sized to power all of the pavilion's loads - videos screens, speakers, lights, cell phone chargers and all of the irrigation pumps.

Systems Diagram - by WORKac

Pavilion Programming

Each column is programmed to create a variety of experiences and interactions beneath the farm. These include a solar-powered juicer for fresh veggie cocktails, a periscope to provide close-up views of the fields, a towel column and a water-spouting column next to the pool, two columns joined together with a bench and enclosed by a curtain to provide privacy, a nighttime column of twinkling stars and cricket sounds and a solar-powered phone-charging column. In the smaller courtyard a series of experiential columns use video and sound to bring animal life to P.F.1 simulating the farm experience in this urban environment.

Ground Program - by WORKac

P.F.1 - by WORKac

Video

The following video shows the creation of Public Farm 1, including construction issues, how it was created and the methods they used to make this fascinating concept a reality.


Public Farm 1 - Sur les Pavés la Ferme from WORKac on Vimeo.

Sources

WORK Architecture Company
MoMA Public Farm Exhibit Webstite

Sunday, June 15, 2014

Design Help: Kitchen Cabinet Dimensions

Kitchen with Standard Cabinets - Source

Kitchen cabinet sizes are largely standardized. Unless you are dealing with custom kitchen cabinetry, which can build cabinets with any dimensions, you will find lower prices and predictable sizing in stock or semi-custom kitchen cabinets. Because kitchen cabinets come in hundreds of sizes, below is a guide to a few of the more common kitchen cabinet sizes.


Standard Cabinet Dimensions

1. Base Cabinet Sizes

Base cabinets are the workhorse of kitchen design. They are installed directly on the floor, counters are installed on them, sinks installed within them, dishwashers and ranges bracketed by them, etc. See more about sink base cabinets below.

Height and Depth
  • Height: 34.5". After adding counter top materials, total height will raise to 36".
  • Depth: 24". Base cabinets tend to be limited to 24". Deeper base cabinets make it difficult for you to reach the back of the counter or to plug in appliances.
Width:
  • 12", 18", 24" Filler cabinetry.
  • 48": Typically the largest size base cabinet, not often used. 
  • Custom Width cabinets are always available, of course you will pay more for them


2. Wall Cabinet Sizes

Height and Depth:
  • Height: Common wall cabinet heights are 12", 36", and 48". The 12" cabinets fit neatly over fridges.
  • Depth: 12" to 24". Maximum depth for wall cabinets is 24" because it cannot exceed the depth of base cabinets.
Width:
  • A standard, single- or double-door wall cabinet width is 30". Cabinets can run as narrow as 12" or 15". Cabinets wider than 30" are generally not used.


3. Tall Cabinet Sizes

Tall kitchen cabinets, also known as a pantry or utility cabinet, often reach ceiling height. Be aware of how high your ceiling are if you would like to put crown molding above it.

Height and Width:
  • Height: 84" to 96". Those 96" cabinets take you right up to the ceiling. The 84" tall cabinets give you one foot of breathing room above the cabinet--but no practical purpose to that above-cabinet spacing.
  • Depth: 12" to 24". Shallower, 12" deep pantry cabinets are common because they are used for storing food. If the cabinets are deeper, it is likely you would lose food in the the back of the cabinet.
Width:
  • 12": Narrow pantry cabinets hold far more food than you might think. Plus, they can fit in otherwise-neglected spaces. 
  • 24": Another common pantry cabinet width.
  • 36": If you want bells and whistles, such as pull-outs and storage on the doors, you'll need a wider pantry cabinet.

4. Sink Base Cabinets

Sink base cabinets are specialized base cabinets. Be mindful of what size sink you would like to install to help you decide which one to get. Also note the depth of the sink, it will help decide which sink base you need for your design.

Height and Depth
  • Height: 34.5". Again, after adding counter top materials the total height will increase to 36". A farm sink might replace the top of the cabinet varying the height. Consult your kitchen designer for a specialty cabinet.
  • Depth: 24".
Width:
  • 30": Single-basin sink.
  • 33": Can accommodate a double-basin, offset sink.
  • 36": Can accommodate a double-basin sink.

    Thursday, May 29, 2014

    Film: My Architect

    My Architect: A Son's Journey is a documentary film by Nathaniel Kahn on his father, Louis Kahn (1901-1974), detailing the architect's extraordinary career and his family legacy after his death.

    Louis Kahn is quoted in the film saying “When I went to high school I had a teacher, in the arts, who was head of the department of Central High, William Grey, and he gave a course in Architecture, the only course in any high school I am sure, in Greek, Roman, Renaissance, Egyptian, and Gothic Architecture, and at that point two of my colleagues and myself realized that only Architecture was to be my life. How accidental are our existences are really, and how full of influence by circumstance.”

    The film includes interviews with renowned architects, including Frank Gehry, Shamsul Wares, I.M. Pei, Anne Tyng and Philip Johnson. Throughout the film, Kahn visits all of his father's buildings including: The Salk Institute, The Yale Center for British Art, Jatiyo Sangshad Bhaban and the Indian Institute of Management Ahmedabad.


    Sunday, December 29, 2013

    Architectural Sketching: Streetscape

    Streetscape by Jigsketch
    Architectural sketches come in many types though the street can be considered a very important aspect of any built environment. The threshold between a building and the street has always been an important aspect to any design which is why architects have been concerned with facades for centuries.

    Being able to sketch a section through the streetscape to show how your building relates to its surroundings is an important means to convey your design. You can also diagram over these sketches to show views, solar exposures, etc. Check out these videos by Jigsketch on YouTube where he sketches some great streetscapes in Australia. The first video also gives you some insight into style and how to color. A great way to show different street typologies and explore how they interact with vehicles and pedestrians.


    Saturday, December 28, 2013

    Tutorial: Pencils and Leads

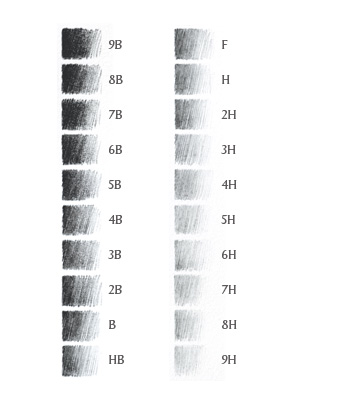
    Pencil Grading Chart
    Pencil cores are generally made of graphite mixed with a clay binder which creates easily erased grey or black marks. Graphite pencils are used for both writing and drawing which provides a durable mark, resistant to moisture, ultraviolet radiation, and aging.

    Pencils come with either numbers or letters on them. From the image right, we can see that the letter B signifies the blackness of the pencil, the letter H signifies the hardness, and the letter F stands for 'fine.' In the United States, we use a different system using numbers to identify pencil hardness, ranging from #1 to #4. A #2 pencil, all to familiar to those that grew up in the US is the equivalent to the European HB.

    The B's get darker and as you get to 9B they become more and more charcoal like. B's are tougher to erase than H leads so remember what type of sketch or drawing you are doing. Quick sketches using a B lead are very vibrant with more emotion then with an H lead. H leads are harder and make then easier to erase. Just remember that the harder you press down, they will indent the paper making them tough to erase, just watch the amount of pressure you use. I tend to use an H lead, such as a 2H, 4H, or even 6H to start my drawings, sketch it out, and use an HB or a B lead to go over it, just remember B leads are tougher to erase. You can always use as many leads as you want and layer over it. You can even use the leads to color your drawing or sketch using the leads. A 4H lead for example is very grey, I sometimes use this for metal, while an HB can be used for shadows with a 6B can be used for deep shadows or whatever you want to be black. Look at the image above again and you will see what I mean.

    I recommend buying a cheap electric pencil sharpener and a few pencil sharpeners to make sketching easier. A scrap piece of paper can also work well to help keep the ideal edge or point on your pencil. Using conventional leads to draft can be difficult, but not impossible. It is better to use a lead holder and sharpener, as the leads are much sharper which gives you a cleaner, sharper drawing. You can also use lead holders for sketching and drawing. Mechanical pencils can also be used for drafting, however I prefer to use them to do homework as they don't need sharpening.

    Beginners

    If you are just starting to draw, you might one to pick up just a few pencils to get a feel for them. You don't necessarily need pencils of each type, opt to get a few: 4B, 2B, HB, 2H, 4H will suffice and will save you a little money. A combo pack or starter set gets you the best bang for your buck, just be sure you check which leads they come with. As an architecture student, you probably want ones in the middle (6B through 4H), though a 9B you might like for some quick sketches now and again.

    Staedtler Starter Set
    Quality

    The last thing that you should be aware of is pencil quality. If you buy pencils that are not high quality, the leads are more prone to break with a wood casing of questionable quality. I have been drawing for about 30 years and I recommend using Staedtler pencils, they are my favorite brand. However, Koh-i-Noor, Faber-Castell, Derwent, and Turquoise are all my second choices. General pencils I found not too be too great however they make great charcoal pencils. To start, buy a pencil set of some sort and play with them. Once you figure out which leads you prefer, you can always buy replacement pencils later as you use them up.

    Staedler Pencil Set


    Jumbo Pencils

    Other then the standard type of pencil, they do have thick lead pencils. They might look like they are the kind that children use to learn to write since they are thicker and easier to grip. I find this type of pencils quick comfortable to use and great for sketching. The thick leads are great for sketching, especially quick sketches aimed at capturing the feeling of what you are drawing. Koh-i-Noor makes triangular ones which are very comfortable to hold but you will need to sharpen them with a knife. Faber Castell makes some that are round and thicker referred to as their Jumbo pencils.They are designed to be used with those jumbo pencil sharpeners we used as kids.

    Koh-i-Noor Triograph Pencils

    Faber Castell Jumbo
    Woodless Pencils

    Another type of pencil is the woodless pencil. Instead of having wood, the whole pencil is a lead. They can be expensive, though they are similar to using charcoal and you can use the edge of it for gestures. They can be messy to use, I recommend buying something in the 4B to 2H range. If you get a 9B, it will be tough to use as it will smudge easily. These type of pencils are great for quick sketches. Careful how you store them, they can break much easier than a wood pencil.

    Woodless Pencils
    Storage

    Personally, I have all my pencils in a Yasutomo Niji pencil Roll. This way I have easy access to whichever pencil I need while working. I have many types of pencils, a set of Staedtler pencils, some woodless pencils, some jumbo pencils, blenders, a few erasers (pinkwhite, wood and mechanical eraser) and a mechanical pencil for good measure (i.e. for taking notes, doing homework ), or writing something down). Check out my pencil roll below.


    You can also store them in a pencil bag or case. You can also just keep them in the original tin, if you purchase a pencil set. Use whatever works for you. Hunt around your local or online art supply store to see what might work for you. I use Amazon myself.

    Drafting

    Drafting leads are a bit different and you'll need some additional supplies. Check out our Tutorial on Drafting Necessities. If you are looking for information on drafting techniques and workflows, please see our Hand Drafting Tutorial.

    Pencil Textures

    Now that you know all about pencil leads. Check out the following video that will show you how to use your pencils to create basic textures in your drawings.


    I hope you found this post informative. Please post any questions or comments below.